
Auto-generate semantic releases with GitHub Actions adopting conventional Git commits
Delivering high quality releases at a fast pace is a challenge many organizations struggle with. With so many factors to consider, ranging from versioning and metadata management to source control integration and automated testing, it’s no wonder many organizations default to simple change sets.
1. Introduction
Enabling developers in an organization to use proper organized linting and commit messages will make our lives much easer. Using a standard versioning system, such as semantic versioning with Git and knowing how to use Git tags to easily tag a repository with a proper release number, helps teams easily manage their product.
No matter the size or complexity of your environment, you should use automation tools and services to make deployment and tasks approachable. The tools we will use in this blogpost, provide a high level of visibility throughout the deployment process.
The CI workflow we are going to setup consists of:
1) add a meaning to our commits
2) validate commit messages
3) ingest pre-commit Git hooks into our CI cycle
4) create a release adopting semantic versioning
5) auto-generate CHANGELOG file
2. Pre-reqs
To get started, we first install the latest version of NodeJS.
The CI workflow that we are going to setup is build around the NPM eco-system. If you create a NodeJS project from scratch a package.json file will get created automatically using the command:
npm init -y
3. Conventional Commits
Conventional Commits is a specification for adding human and machine-readable meaning to commit messages.
3.1 Commitizen
Commitizen walks you through creating a Git commit and formats it to the conventional commit standards. Install commitizen using the command:
npx commitizen init cz-conventional-changelog -D -E
This will install the commitizen dependency and configures it with the conventional commits commitizen adapter.
- The -D flag is to save the adapter to devDependencies
- The -E flag is to set an exact version instead of a range
Commitizen works on staged Git changes only. Make a modification to a file in your Git repository and stage them with git add.
git add package.json
npx cz
Using npx cz will present you a menu to construct the conventional commit. Below you can see it in action.
Your Git commit history looks clean and standardized which will allow everybody within your team to understand better what has been changed over time.
3.2 Commitlint
Providing guidance on how to correctly format our Git commits is one step. Commitizen however does not enforce anything. Commitlint validates messages based on conventional commits.
We must install Commitlint along with its conventional commits adapter. We create the commitlint.config.js file in the root of our project. The installation of Commitlint is done via the following commands:
# Install commitlint cli and conventional config
npm install --save-dev @commitlint/cli @commitlint/config-conventional

# Configure commitlint to use conventional config
echo "module.exports = {extends: ['@commitlint/config-conventional']}" > commitlint.config.js
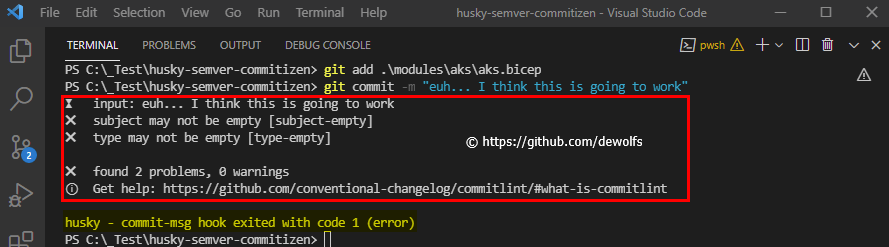
If you are not following the conventional commit standard you will get the following message and your commit is not pushed to the central Git repository.
Run the following command in order to install all developer modules required for our workflow. The command will use the package.json file as input to know which modules need to be installed.
npm install --only=dev
4. Git Hooks
Git hooks are custom scripts that are executed at certain events in the Git lifecycle. If any of the checks fail, the commit operation is aborted. This will help us to keep our repository clean.
A solution to validate commit messages can be implemented using Pre-commit Git hooks. Catching this later in the flow inside our CI/CD flow is too late. The commit is already there and synchronized with the central repository. Commit validation must be automated.
![]() This is where Husky comes in the picture. It is plugged into the Git hook config to validate lint rules before committing.
This is where Husky comes in the picture. It is plugged into the Git hook config to validate lint rules before committing.
Husky allows us to call scripts using Git hooks within our projects. Pre-commit hooks are actions that run after staging your changes and running Git commit and before a commit is completed.
4.1 Husky
Using Husky and Git hooks helps us to enforce commit conventions, formatting style, tests, etc…
We start with installing Husky:
# Install Husky
npx husky-init && npm install --save-dev

# Add hook
npx husky add .husky/commit-msg 'npx --no-install commitlint --edit "$1"'
5. Semantic release
Semantic release is a specification for how to number software releases, which uses three numbers (e.g. 1.2.5). It is being used by more and more open source projects and now in enterprises. The image below will help you understand how to read and apply the version numbers correctly.

Adopting conventional commits allows us to create semantic releases in an automated way.
- Major: your commit message must contain “breaking changes”
- Minor: your commit message must have type “feat”
- Patch: your commit message must have type “fix”
- All other commit messages (refactor, chore, build, style, docs, ops) will not bump the version of your release.
5.1 Github Action
One of the most important parts of the software development life cycle is delivering our software to those who use it. We want to make it easy to create and communicate compelling, high-quality releases while encouraging collaboration and engagement.
The Github Action workflow below is just doing that.

- [1.] This Github action is triggered when a push to our master branch is executed.
- [2.] The “conventional-changelog” action will bump version, tag commit and generate a CHANGELOG file with conventional commits. We take the description of each commit and add it as a description to the CHANGELOG file, publish is as the body of the release notes.
- [3.] The “create-release” action will create a release via the GitHub release API. This action is using the GITHUB_TOKEN provided in each workflow, so no new token is needed. We are using the output of the previous step as input using steps.id-previous step.outputs.
The image below displayes our Github Action create-release log.
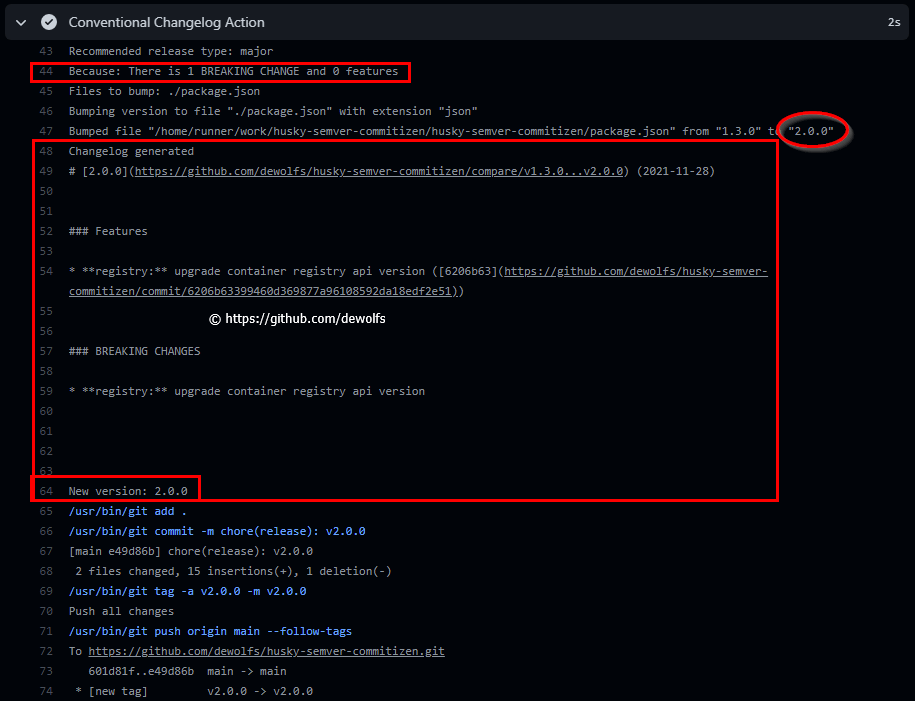
- One feature is found in our Git commit history causing a minor bump following semantic versioning.
- The content of the CHANGELOG.md file is printed.
- The release is tagged and pushed to our Github repository.
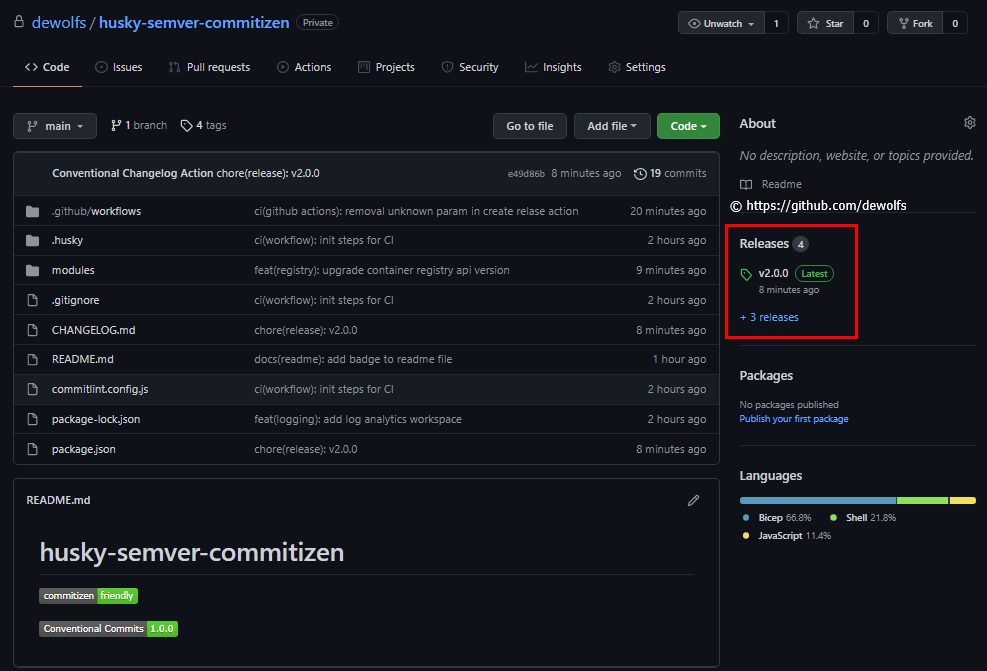
6. Results
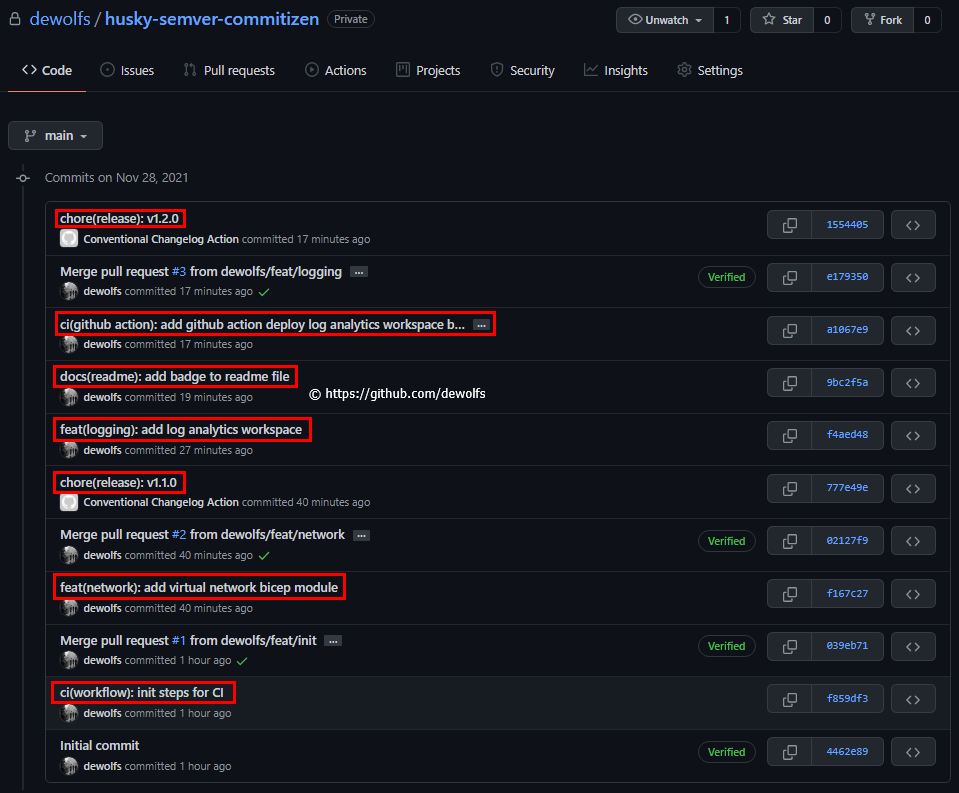
If we take a look at our GitHub repository we can view the result. We have a sematic release with a detailed CHANGELOG describing our release.

6.1 Badge
Adding a badge to your README.md file makes it easier for others to understand the style we are adopting.
[](http://commitizen.github.io/cz-cli/)
[](https://conventionalcommits.org)
![]()
![]()
The configuration we used in this post can be found on https://gitHub.com/dewolfs/husky-semver-commitizen.