
Secure Container Supply Chain in Kubernetes the Easy Way
If you’re running Kubernetes in production, you’ve probably thought about how to keep your clusters and their workloads in compliance with corporate or regulatory policies. In Kubernetes, you’ll do this with an admission controller. An admission controller intercepts requests to the Kubernetes API server and allows you to validate or change it.
1. Introduction to Software Supply Chain Security
Supply-chain Levels for Software Artifacts, or SLSA is a security framework, a checklist of standards and controls to prevent tampering, improve integrity, and secure packages and infrastructure. It’s how you get from “safe enough” to being as resilient as possible, at any link in the chain.
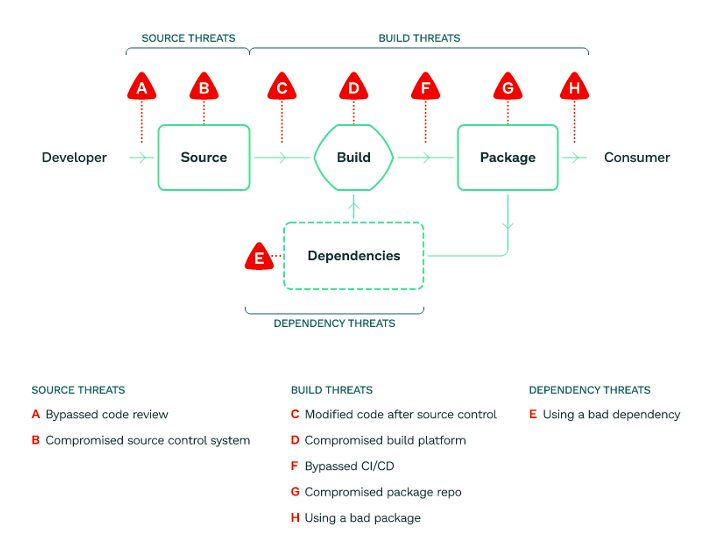
Image by SLSA
How does SLSA help?
- Define what does good look like
- Provide a framework for assessing existing software development lifecycle
- Provide a framework for continuous improvement
- Shift security to the left
- enforce provenance of the build
- enable end-to-end supply chain trust
- enable software development observability
In this blog, we are going to setup Gatekeeper, Ratify and OCI registry to develop supply chain security focused policies for clusters.
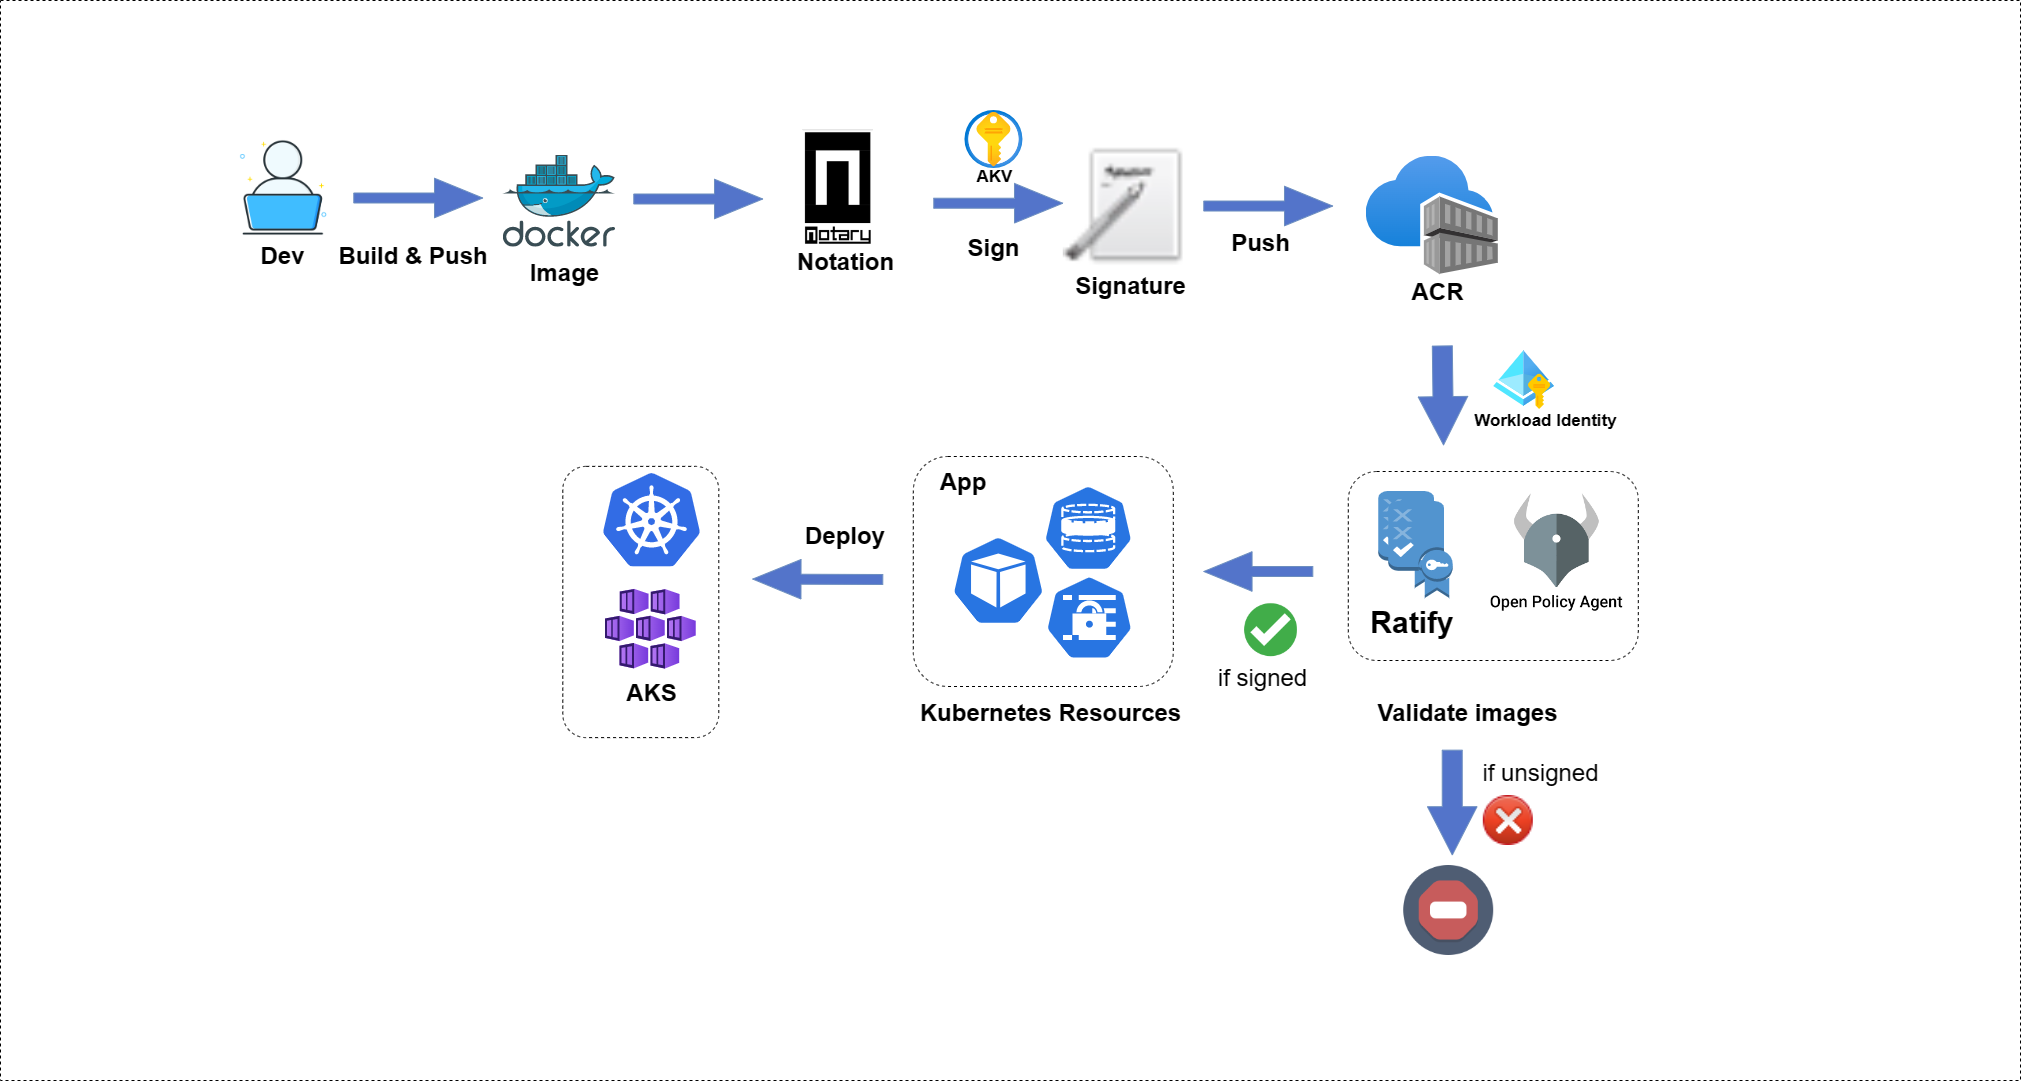
Image by Ratify
2. Tools
![]() Gatekeeper is an Open Polciy Agent based admission controller that enables enforcement of CRD-based policies. These policies normally act on data within the request or other static data within your cluster. However, sometimes that’s not enough. As Software Supply Chain security becomes more important, our policies need to consider more external artifacts. Maybe you want to verify that images are signed or that the SBOM for a service doesn’t have that latest OpenSSL CVE. Gatekeeper’s external data feature allows you to do just this, through the use of plugin providers
Gatekeeper is an Open Polciy Agent based admission controller that enables enforcement of CRD-based policies. These policies normally act on data within the request or other static data within your cluster. However, sometimes that’s not enough. As Software Supply Chain security becomes more important, our policies need to consider more external artifacts. Maybe you want to verify that images are signed or that the SBOM for a service doesn’t have that latest OpenSSL CVE. Gatekeeper’s external data feature allows you to do just this, through the use of plugin providers
![]() Notary is a CNCF project that provides a set of tools that help you sign, store, and verify OCI artifacts using OCI-conformant registries. Digitally signing artifacts is one of many steps you can take to secure your software supply chains and improve the security of your software.
Notary is a CNCF project that provides a set of tools that help you sign, store, and verify OCI artifacts using OCI-conformant registries. Digitally signing artifacts is one of many steps you can take to secure your software supply chains and improve the security of your software.
![]() Ratify is an open source project that enables Kubernetes clusters to verify artifact security metadata prior to deployment and admit for deployment only those that comply with an admission policy that you create. Ratify is an extensible verification framework for container images and other artifacts that can examine and use custom policies that you create to approve deployments in Kubernetes. Ratify can use and coordinate any number of custom verifiers for things like signatures, SBoMs, scan results, and so on.
Ratify is an open source project that enables Kubernetes clusters to verify artifact security metadata prior to deployment and admit for deployment only those that comply with an admission policy that you create. Ratify is an extensible verification framework for container images and other artifacts that can examine and use custom policies that you create to approve deployments in Kubernetes. Ratify can use and coordinate any number of custom verifiers for things like signatures, SBoMs, scan results, and so on.
3. Infrastructure
The provisioning of the infrastructure is executed via GitHub Actions using the Azure CLI. We have split it up into 3 separate GitHub workflows.
3.1 Azure resources
The GitHub workflow (.github/workflows/100-infra-deploy.yaml) will deploy the following Azure resources:
- 1. User-assigned managed identity
- 2. Kubernetes cluster: workload identity enabled (OIDC) + attached the user managed identity
- 3. Key Vault: role assignment for the user-assigned managed identity
- 4. Container registry : role assignment for the user-assigned managed identity
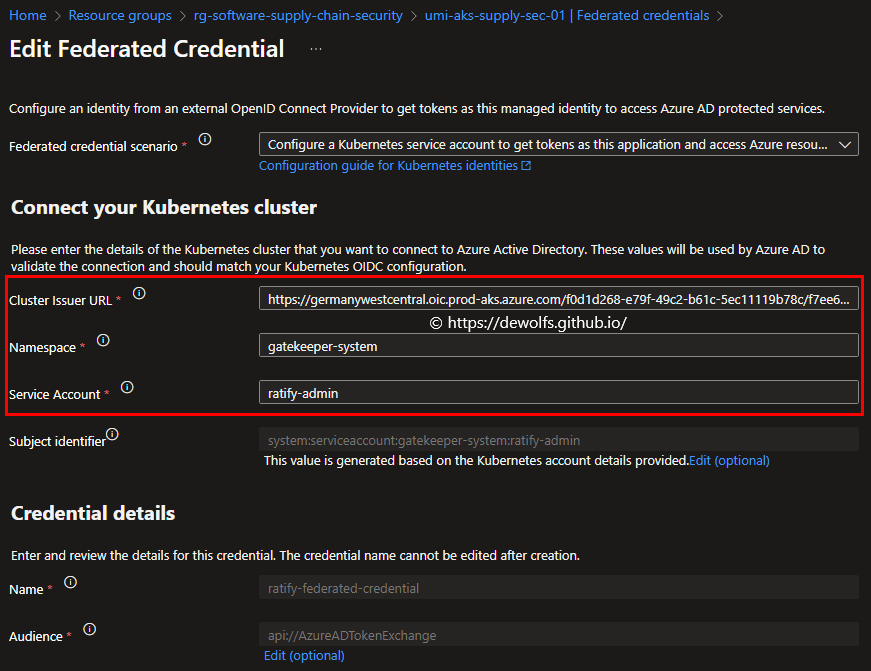
- 5. Federated credential : on the user-assigned managed identity
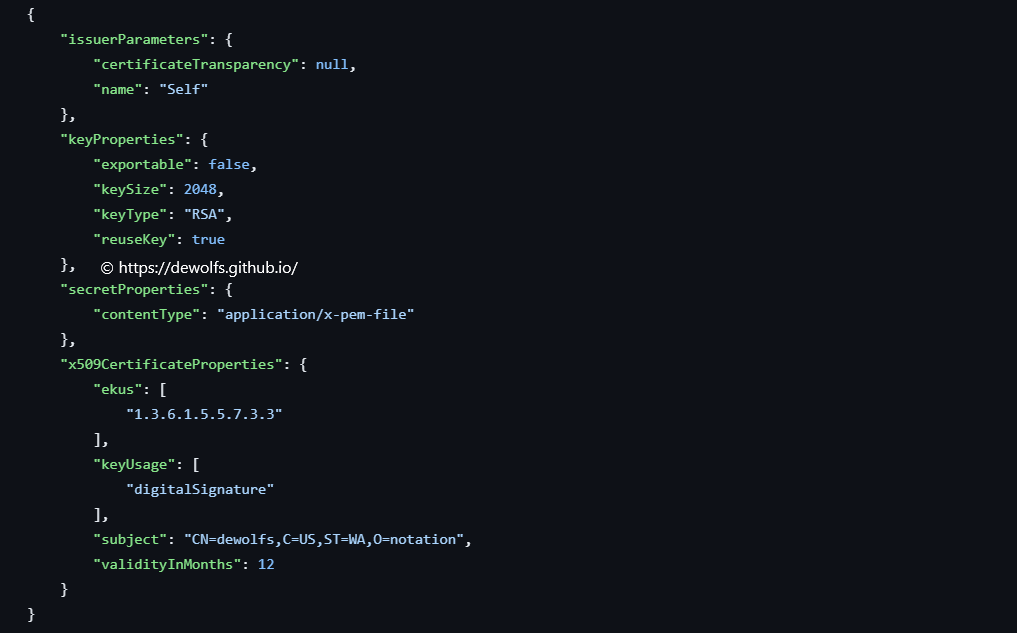
- 6. Self-signed certificate
The federated credential should look similar as below:
The self-signed certificate is created based on the policy selfSignedPolicy.json:
3.2 Tools
The second GitHub workflow (.github/workflows/200-install-tools.yaml) will install the necessary tools:
- A) Gatekeeper needs to be installed with the parameter enableExternalData=true so that it will check with Ratify if an image is signed or not.
--set enableExternalData=true
- B) Ratify enables Kubernetes clusters to verify artifact security prior to deployment.
The installation of Ratify is referencing the Azure KeyVault we created before. Ratify will use the self-signed certificate to judge if the container image has been signed by a valid certificate or not.
helm install ratify ratify/ratify --atomic \
  --namespace gatekeeper-system --create-namespace \
  --set provider.enableMutation=false \
  --set featureFlags.RATIFY_CERT_ROTATION=true \
  --set akvCertConfig.enabled=true \
  --set akvCertConfig.vaultURI=${VAULT_URI} \
  --set akvCertConfig.cert1Name=${CERT_NAME} \
  --set akvCertConfig.tenantId=${TENANT_ID} \
  --set oras.authProviders.azureWorkloadIdentityEnabled=true \
  --set azureWorkloadIdentity.clientId=${CLIENT_ID}
3.3 Sign and verify artifacts the easy way
The third Github workflow (.github/workflows/300-sign-image.yaml) will use the self-signed certificate for signing the container image using the Notation CLI.
4. Secure Supply Chain in CI/CD pipeline
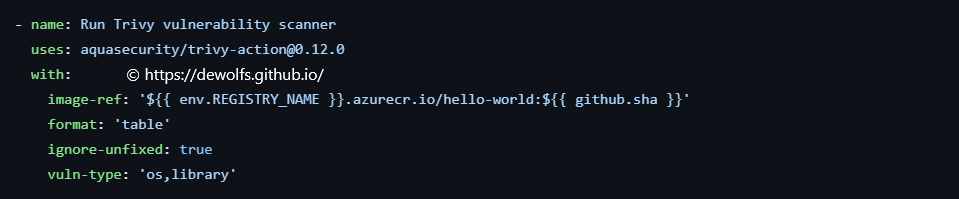
4.1 Vulnerability scanning
As a first step, we want to execute a vulnerability scan on the container image. For this activity, we use the Trivy tool.
4.2 Image signing
Notation is an open source supply chain tool developed by the Notary Project, which supports signing and verifying container images and other artifacts. For each of the CLI commands, a GitHub Action is available.
4.2.1 Setup Notation CLI
You can specify the extact Notation CLI version you would like to use in your workflow.

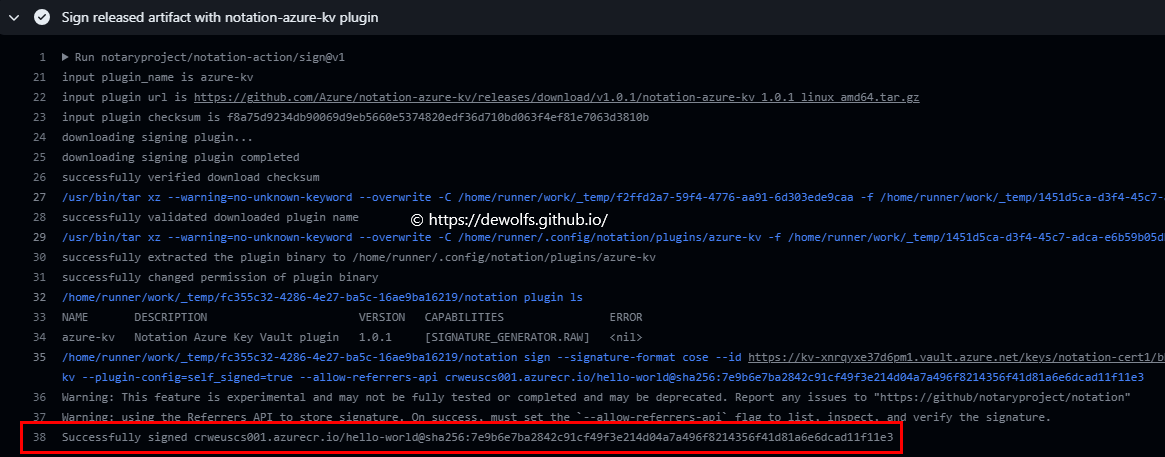
4.2.2 Sign released artifact with notation Azure KeyVault plugin
Our self-signed certificate is stored in an Azure KeyVault. To enable Notation to use it, we need to install the Azure KeyVault Notation plugin.

4.2.3 Add certificate to trust store
The self-signed certificate we created, needs to be added to the trust store that Notation is using for verification. The location in the directory structure where this certificate is stored is important.

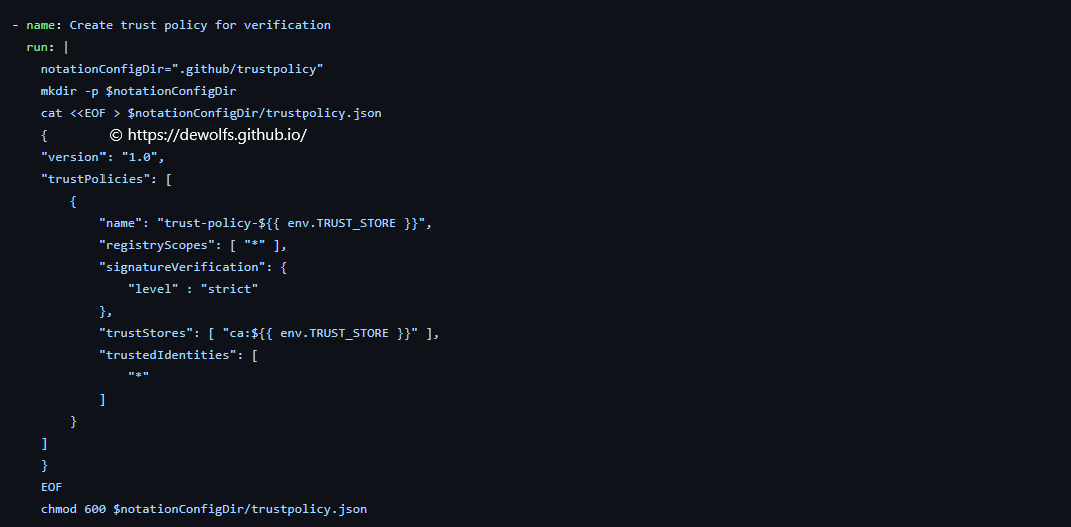
4.2.4. Create trust policy for verification
We verify the signature with the Notation CLI using a valid Notation trustpolicy document. Multiple trust policies can exist. The trustpolicy contains the following items:
- Registry scope; a wildcard “*” indicates all registries are allowed
- Signature verification
- Truststores used for verification
- Trusted identities
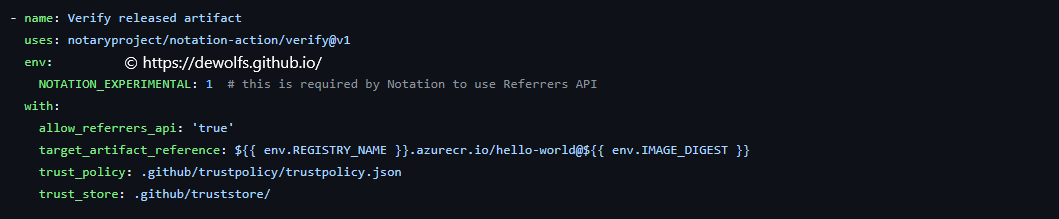
4.2.5. Verify released artifact
We can verify the signatue of the container image stored in our container registry:

4.3 Software Bill Of Material (SBOM)
Next to a signature, we can also store other artifacts alongside our container image. Another example is attaching the SBOM to our image. We use the tool Syft to create the SBOM.

The tool ORAS, attaches the SBOM to our container image just like the signature.


5. Results
Deploy two sample images to the AKS cluster.
5.1 TEST 1: unsigned container image
Deploy an unsigned image to the AKS cluster. The deployment has been denied since the image has not been signed and doesn’t meet the deployment criteria.
kubectl run hello-world-unsigned --image=hello-world:latest --namespace default
kubectl logs ratify-7c5bb58658-mkmdl -n gatekeeper-system
kubectl logs azure-wi-webhook-controller-manager-57c9d955b6-s4g8m -n kube-system


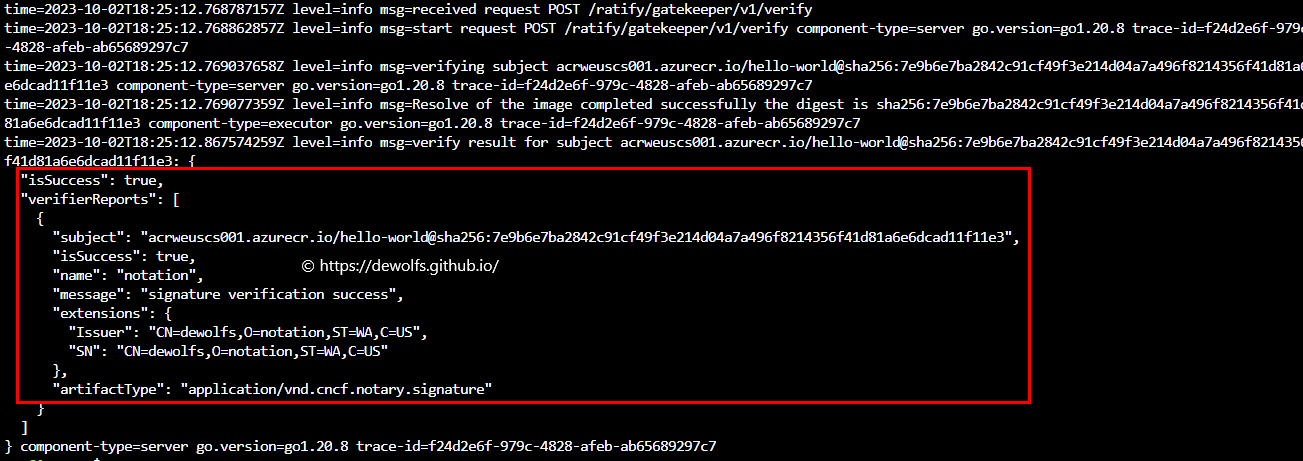
5.2 TEST 2: signed container image
Run a Pod using an image that we have signed in the previous step. Ratify will verify if this image has a valid signature.
kubectl run hello-world-signed --image=acrweuscs001.azurecr.io/hello-world@sha256:7e9b6e7ba2842c91cf49f3e214d04a7a496f8214356f41d81a6e6dcad11f11e3 --namespace default
kubectl logs ratify-7c5bb58658-mkmdl -n gatekeeper-system
kubectl logs azure-wi-webhook-controller-manager-57c9d955b6-s4g8m -n kube-system

The configuration we used in this post can be found on https://github.com/dewolfs/software-supply-chain-security.