
Deploying and scaling Azure serverless containers with Azure Load Testing and GitHub Actions
Microservices help teams build and deliver applications faster and more scalable than traditional architectures. Containers are a core piece of tech when building microservices because they provide a consistent way to package and run microservice code anywhere.
Kubernetes is a powerful container orchestrator, it knows how to run containers and microservices at cloud scale. But it’s not always easy. Some developers might struggle in learning and understanding Kubernetes just to get their containers up & running.
Let’s say you’ve carefully crafted your first containerized application and you’re ready to deploy it to production. Well, not quite: there are still some important unknowns to understand before your application will be ready for production traffic. It’s still unclear how the new application behaves when it’s being pushed. When the application is under heavy load there are a few key metrics to watch to identify bottlenecks.
1. Introduction
![]() Back in November 2021, Microsoft released the new service Azure Container Apps (PREVIEW). It enables you to run microservices and containerized applications on a serverless platform. As a serverless application centric hosting service where users do not see or manage any underlying virtual machines, orchestrators or other cloud infrastructure.
Back in November 2021, Microsoft released the new service Azure Container Apps (PREVIEW). It enables you to run microservices and containerized applications on a serverless platform. As a serverless application centric hosting service where users do not see or manage any underlying virtual machines, orchestrators or other cloud infrastructure.
Azure Container Apps enables executing application code packaged in any container and is unopinionated about runtime or programming model.
![]() Azure Load Testing (PREVIEW) is a fully managed load-testing service that enables you to generate high-scale load. The service simulates traffic for your applications, regardless of where they’re hosted.
Azure Load Testing (PREVIEW) is a fully managed load-testing service that enables you to generate high-scale load. The service simulates traffic for your applications, regardless of where they’re hosted.
Developers, testers and quality assurance (QA) engineers can use it to optimize application performance, scalability or capacity.
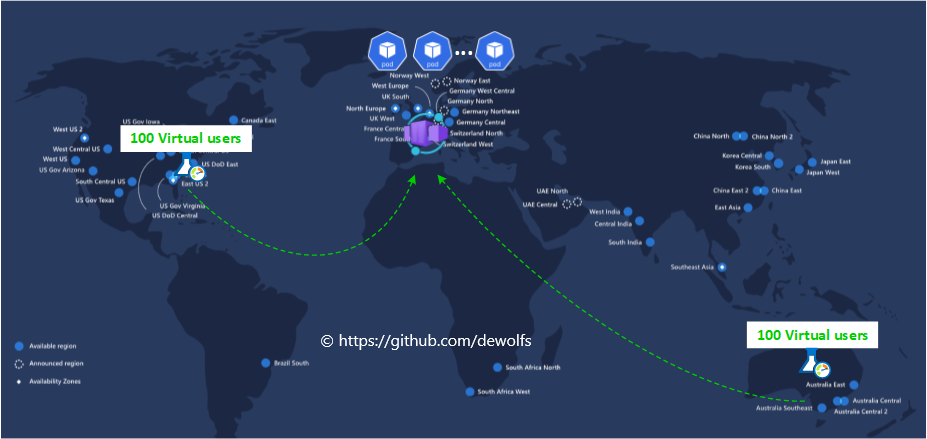
In this blogpost, we are going to deploy a containerized application to Azure Container Apps and execute load tests as part of our Continuous Delivery pipeline to evaluate the impact of the tests on our application. We are going to initiate traffic from two places (US and Austratia) targetting our Azure Container App.
- Deploy the necessary Azure resources.
- Create .NET Core container image and send telemetry data to Azure Application Insights.
- Deploy our containerized application with scaling definition to Azure Container Apps.
- Run Azure Load testing.
- Monitor impact (scaling) of load test on Azure Container App.
2. Azure resources
With Azure Container Apps we instruct what container image we want to run and map to the port our application is listening on. This creates a super fast path to publish and run containers. Behind the scenes, Azure Kubernetes is powering Azure Container Apps. But we don’t need to configure or manage the cluster. Every Container App can auto-scale to zero and scale to dozens of containers when under high load using open-source technologies. KEDA is the open-source technology that makes that happen.
Three GitHub workflows are used to create what is needed in this blogpost.
A) GitHub workflow 001-infra-deploy.yml
- Azure Container Apps Environment
- Application Insights
- Load Testing resource in US and Australia
B) GitHub workflow 002-build-push.yml
- Build and push .NET Core image
C) GitHub workflow 003-thebank-app-deploy.yml
- Deploy Azure Container App
- Execute load testing
We use the same approach as we have discussed in the previous post Using OpenID Connect (OIDC) tokens with GitHub Actions and Azure.
3. Application
3.1 Setup telemetry data
We start by creating a .NET Core application and add the Application Insights Nuget package. How this is done, is described in a previous post Monitoring .Net Core Application with Prometheus on Azure AKS.
We use the command below to add the Application Insights library to our application:
dotnet add package Microsoft.ApplicationInsights.AspNetCore --version 2.20.0
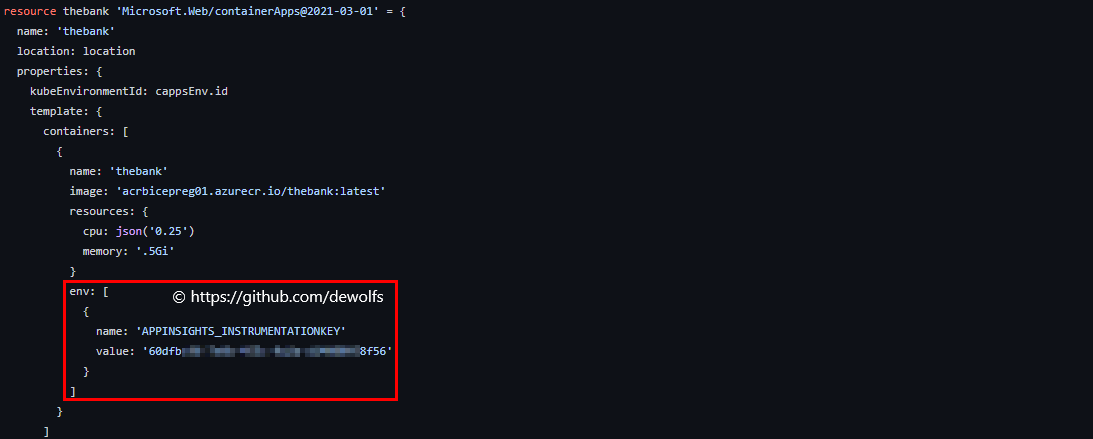
If we have our Application Insights Azure resource up & running, we need to instrument our .NET Core Application to send telemetry data. Environment variables can be defined as an array of key/value pairs. The Key must be APPINSIGHTS_INSTRUMENTATIONKEY and the Value is the instrumentation key.
3.2 Create container image
Next, we are going to create our application container image. We are using a multi-stage Dockerfile. In the first stage we use the SDK .NET Core container image as starting point to build and publish our application. This image contains more tooling and is therefor larger than the ASP.NET Core image.
3.3 Build & push
The first step of our GitHub workflow 002-build-push.yml creates a unique tag to version our container image. The output of the step with id prep is saved and used in the last step when we push our image to our private Azure Container Registry.

3.4 Azure container app
Our container image is now available inside our private Azure Container Registry. Similar to a Kubernetes deployment YAML file, we define what container image must run. Below you can view our Azure Container App configuration (thebank.bicep) written in Bicep:
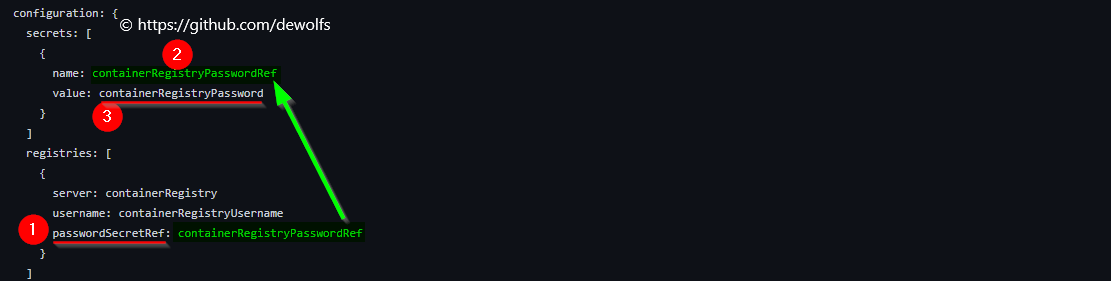
- 1) passwordSecretRef: When referencing a container image stored in a private container registry, the registries section must be used. Pulling a private container image require a username and password.
- 2) containerRegistryPasswordRef: The password needs to be kept as a secret so you notice the value of passwordSecretRef is calling the secret with name containerRegistryPasswordRef in the secrets section.
- 3) containerRegistryPassword: The secrets section contains a secret with name containerRegistryPasswordRef and value containerRegistryPassword. The value containerRegistryPassword is provided via a parameter. We have stored our private registry password as a GitHub secret in our repository.
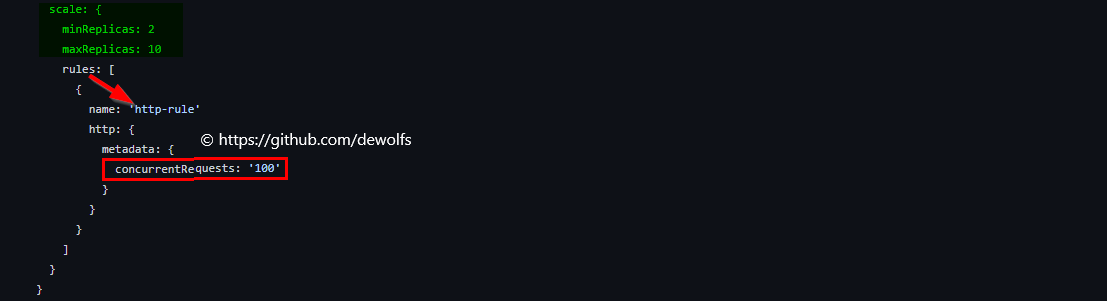
Azure Container Apps scales in/out based on HTTP requests. The below scale configuration has a minimum replica count of 2 and a maximum replica count of 10.
4. Load testing
Azure Load Testing is designed to help developers and testers gain confidence in their application’s performance. Generally, we want an easy way to be able to simulate real world traffic and be able to learn how our application is behaving under stress.
4.1 Prerequisite
First, we need to assign the specific Azure role Load Test Contributor to:
- user account: if you want a human to interact with Azure Load Testing via the portal
- SPN: if you plan to use Azure Load Testing in your CI/CD pipeline

4.2 Test plan
The Azure Load Testing resource is like a hub where we can add all of our tests, manage access to those tests, view historical results, etc… Part of the test plan is a JMeter script. JMeter is a very popular open-source load testing framework. The JMeter script the_bank_test_plan.jmx contains configuration which defines ramping up of the amount of virtual users that would be accessing our application at the same time.
<stringProp name="ThreadGroup.num_threads">100</stringProp>
<stringProp name="ThreadGroup.ramp_time">10</stringProp>
<boolProp name="ThreadGroup.scheduler">true</boolProp>
<stringProp name="ThreadGroup.duration">60</stringProp>
<stringProp name="ThreadGroup.delay">5</stringProp>
- Number Of Threads: It represents the total number of virtual users performing the test script execution.
- Ramp-Up Period (in seconds): It tells JMeter how long to take to reach the full number of threads. In the example above, JMeter will wait till 10 seconds to make all threads up and running.
4.3 Load testing part of CD pipeline
Going one step further, we can integrate Azure Load Testing as part of the continuous delivery pipeline. This allows us to compare the application’s performance as soon as we deploy it and learn whether we’ve regressed and need to maybe block deployment to other environments.
Integrating load testing into the continuous delivery pipeline wil help us to test our application at a very early stage in our test environment or pre-prod. This is how we would identify there’s any regression from recent releases. Any new code change should not break how our application performs at scale.
The LoadTest folder in our repository contains the required files. The Azure Load Testing config file (loadTestConfigFile-theBank.yaml) has a few properties required to configure our Azure Load Test GitHub Action.
version: v0.1
testName: load_test_the_bank
testPlan: the_bank_test_plan.jmx
description: 'The Bank Test Run using GitHub Actions'
engineInstances: 1
failureCriteria:
  - avg(response_time_ms) > 50
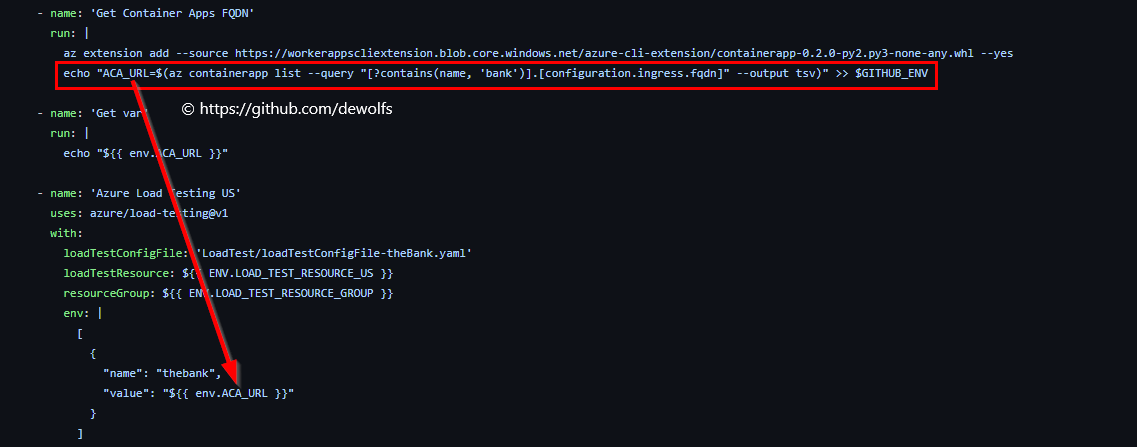
Instead of hard coding the URL of our containerized application in the JMeter script, we have configured a user defined variable (udv).
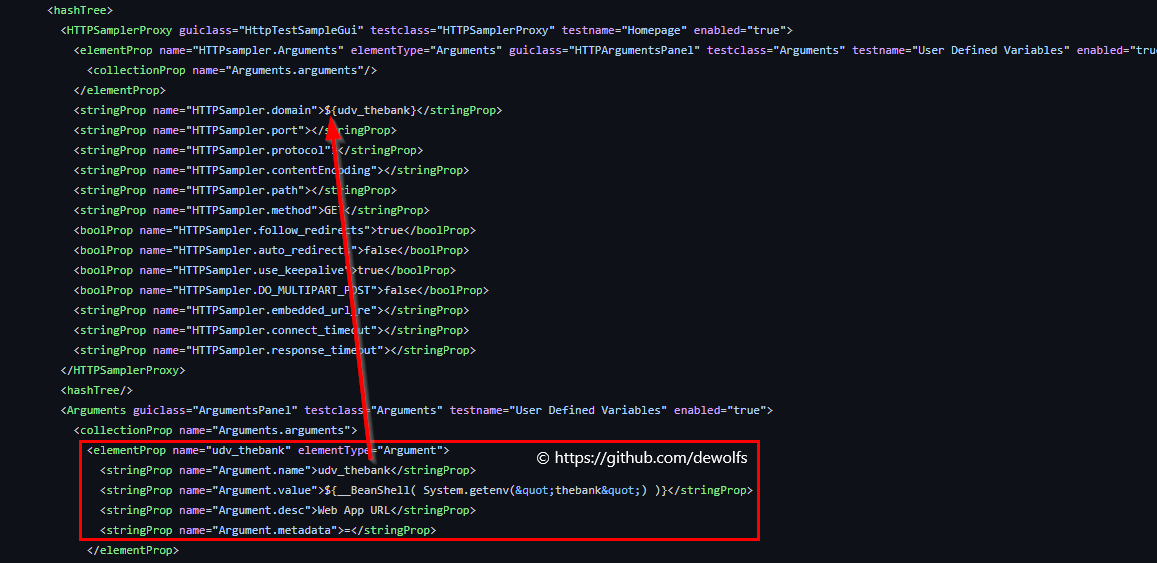
We retrieve the FQDN of the Azure Container App (ACA) via the Azure CLI and store it in a variable (ACA_URL) that can be used in other steps of the GitHub Workflow. The GitHub Action ‘Azure Load Testing’ provides us the capability to define environment variables. In our case, we provide the value of the FQDN as variable.
This provides us end-to-end tracebility of when we submit our code, we build our application in Azure and then we run Azure Load Testing.
5. Results
Below you can see the scale activity of Azure Container Apps in reaction to our Azure Load Testing. Because we have instrumented our container image with Azure Application Insights, the number of pods can be viewed in the Live Metrics section.
Once the Azure Load Testing kicks off, the load on our Azure Container App is increasing and the scale-out operation is executed.
If the Azure Load Test is finished, the load drops and the scale-in operation is executed.
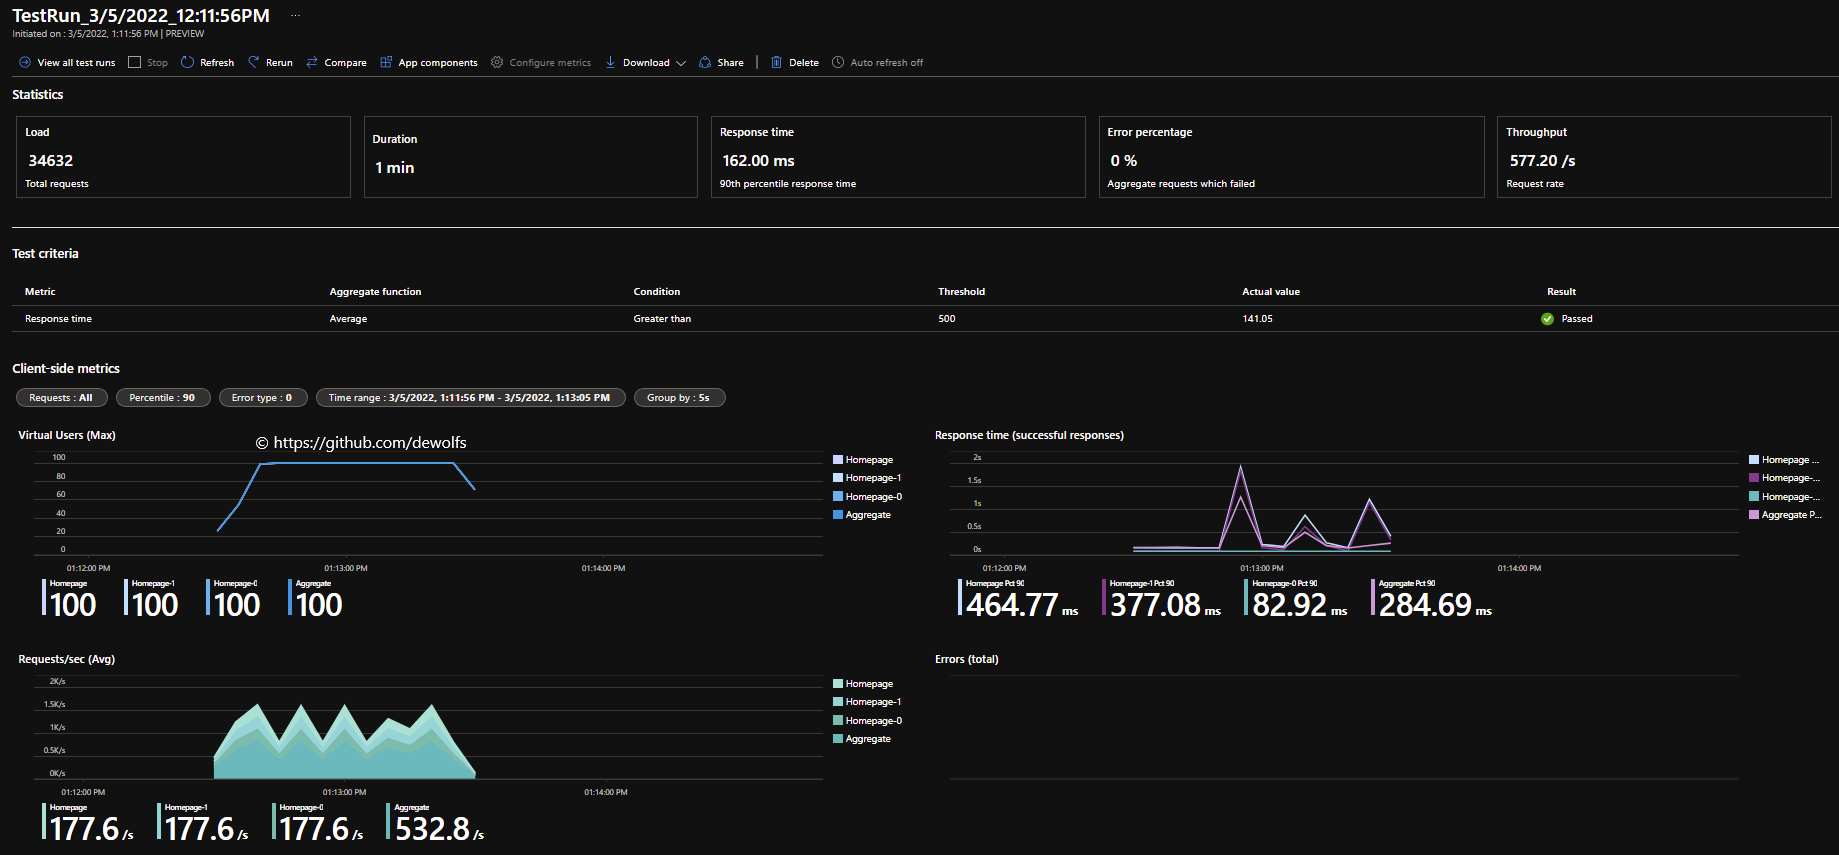
At the end of the load test, the results are available in the Azure Portal.
The configuration we used in this post can be found on https://github.com/dewolfs/azure-containerapps-loadtest.