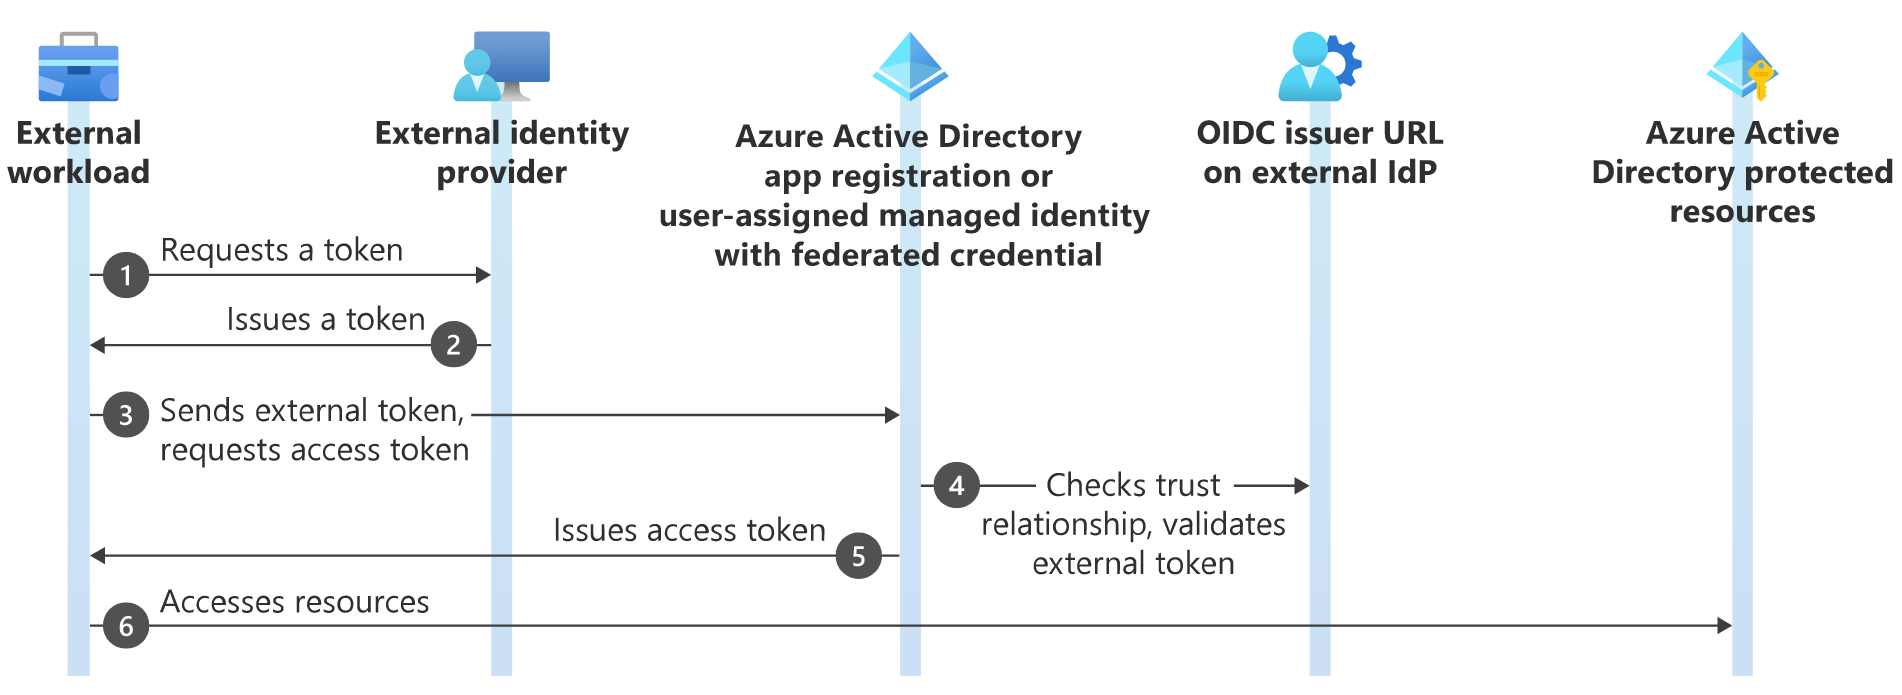
Addressing the cloud native IAM pain points with Workload Identity Federation
Workload Identity Federation for Kubernetes integrates with the capabilities native to Kubernetes to federate with external identity providers. This approach is a keyless application authentication mechanism which is simple to configure and use. It replaces service account keys with tokens for applications.
1. Introduction
Azure AD Workload Identity is cloud agnostic, meaning this solution works in any cloud.
Image by Microsoft
The three main pillars that enable workload identity are
1) Azure AD Federated Identity Credential helps to establish a federated a trust relationshop between an external identity provider and and an identity within an Azure Active Directory. You can turn your Kubernetes cluster into an identity provider using using built-in features. Once your Kubernetes cluster can issue tokens to your workload you can establish a trust relationship between our Kubernetes cluster and an identity in Azure Active Directory (AAD). Once AAD acknowledge this relationship, you can start exchanging tokens issued by your cluster for a valid AAD token. You can use the AAD token to access your Azure resource.
How do we turn our Kubernetes cluster into an identity provider?
In Kubernetes a service account represents an identity that a workload can use. Kubernetes administrators can set RBAC rules to control what their workload can access within the clusters.
2) Kubernetes Service accounts
3) The Kubernetes Mutating webhook job is to intercept any workload admissions requests from the users and project the service account token to the containerized workload file system. It also inject several environment variables. By having a mutating webhook, users don’t have to manually change their workload manifest to support this new authentication flow.
How are these 3 components glued together?
- A user will create a service account for their workload in the Kubernetes cluster.
- A user will initiate a request to AAD to establish a trust relationship between the service account and the identity in AAD.
- Once the relationship is established, we can deploy our workload.
- The mutating webhook will intercept the admission requests that want to use the workload identity and it will automatically project the service account token to the file system as well as a couple environment variables.
- The workload can now leverage the azure SDK to access the Azure resource. The benefit of the Azure SDK is that it helps abstract the token exchange steps and under the hood Azure SDK will read the environment variables and the project service account token in the file system and pass those parameters to Azure AD.
- Azure AD will verify the authenticity of the token. If valid, AAD will return an access token back to the Azure SDK. With the valid access token we can now access any resource in Azure.
2. Setup AKS cluster with OIDC Issuer
The first step is to create an AKS cluster where we enable the OIDC Issuer.
export RESOURCE_GROUP="rg-aks-wi-01"
export LOCATION="westeurope"
export AKS_NAME="aks-wi-01"

az group create --location ${LOCATION} --name ${RESOURCE_GROUP}
az aks create --resource-group ${RESOURCE_GROUP} --name ${AKS_NAME} --location ${LOCATION} --node-count 1 --node-vm-size Standard_DS2_v2 --generate-ssh-keys --enable-oidc-issuer --node-osdisk-size 30 --node-osdisk-type Ephemeral --enable-workload-identity
-
node-osdisk-type Ephemeral - By default, Azure automatically replicates the OS disk for a virtual machine to Azure storage to avoid data loss should the VM need to be relocated to another host. However, since containers aren’t designed to have local state persisted, this behavior offers limited value while providing some drawbacks, including slower node provisioning and higher read/write latency. By contrast, ephemeral OS disks are stored only on the host machine, just like a temporary disk. This provides lower read/write latency, along with faster node scaling and cluster upgrades.
- enable-oidc-issuer - This enables an OIDC Issuer URL of the provider which allows the API server to discover public signing keys.
- enable-workload-identity - The mutating webhook configuration is installed as an add-on.
2.1 OIDC Issuer URL
In addition to the initial issuer URL setup, AKS will handle the rotation of the signing keys for the cluster every 90 days. The issuer URL is part of the AKS cluster properties so you can get it using az aks show.
az aks get-credentials --resource-group ${RESOURCE_GROUP} --name ${AKS_NAME} --overwrite-existing

export KUBE_ISSUER_URL=$(az aks show --resource-group ${RESOURCE_GROUP} --name ${AKS_NAME} --query oidcIssuerProfile.issuerUrl -otsv --only-show-errors)

echo "The cluster oidc issuer url is $KUBE_ISSUER_URL"
What is on this issuer URL?
The OpenID Connect discovery document (standard discovery document which has the issuer URL, JSON Web Key Set URI (JWKS)= URL where the public signing keys are available). We will use this URL later to establish a trust with Azure AD.
curl -s $KUBE_ISSUER_URL.well-known/openid-configuration | jq

The private signing keys are available inside the Kubernetes cluster. This is used to sign the service account tokens and when Azure AD gets the service account tokens it can validate that using this discovery URL and the public signing keys that are available.
3. Workload Identity Federation
At creation time of the AKS cluster, we have opted in to install the mutating webhook required for Azure AD Workload Identity. The following command shows what Kubernetes resources got installed:
kubectl get pods,svc,deployment,replicaset -l azure-workload-identity.io/system=true -A

4. Create Azure User-Assigned Managed Identity
Next we create an Azure user-assigned managed Identity using the following commands:
export SUBS_ID="$(az account list --query "[?isDefault].id" -o tsv)"
export MI_NAME="oidc-wi-demo-01"

az account set --subscription ${SUBS_ID}
az identity create --name ${MI_NAME} --resource-group ${RESOURCE_GROUP} --location ${LOCATION} --subscription ${SUBS_ID}

export MI_CLIENT_ID="$(az identity show --resource-group ${RESOURCE_GROUP} --name ${MI_NAME} --query 'clientId' -otsv)"
echo "The user assigned identity client ID is $MI_CLIENT_ID"
5. Create Kubernetes Service Account
A new Kubernetes namespace is created:
export SERVICE_ACCOUNT_NAMESPACE="oidc-wi-demo"
export SERVICE_ACCOUNT_NAME="oidc-wi-demo-sa"
export TENANT_ID="$(az account show --query tenantId --output tsv)"
echo "The service account namespace is $SERVICE_ACCOUNT_NAMESPACE"
echo "The service account name is $SERVICE_ACCOUNT_NAME"
echo "The cluster oidc issuer url is $KUBE_ISSUER_URL"
echo "The tenant id is $TENANT_ID"
kubectl create namespace $SERVICE_ACCOUNT_NAMESPACE
In the new namespace, we create a Kubernetes service account. We use the Azure user-assigned managed identity as annotation key value pair.
In the labels section, we set the key workload identity to value true. This is what tells the mutating webhook that this service account is going to be consumed for Workload Identity with Azure. So please mutate any pod that uses this particular service account.
cat <<EOF | kubectl apply -f -
apiVersion: v1
kind: ServiceAccount
metadata:
  annotations:
    azure.workload.identity/client-id: ${MI_CLIENT_ID}
  labels:
    azure.workload.identity/use: "true"
  name: ${SERVICE_ACCOUNT_NAME}
  namespace: ${SERVICE_ACCOUNT_NAMESPACE}
EOF
6. Establish trust between AKS and Azure AD
We need to establish a trust between the Azure user-assigned managed identity and Kubernetes. We are going to tie all pieces together and tell to Azure AD to trust the token that we send.
The following command creates the federated credential which lives inside the Azure user-assigned managed identity.
az identity federated-credential create --name "${AKS_NAME}_${MI_NAME}" --identity-name ${MI_NAME} --resource-group ${RESOURCE_GROUP} --subject system:serviceaccount:${SERVICE_ACCOUNT_NAMESPACE}:${SERVICE_ACCOUNT_NAME} --issuer ${KUBE_ISSUER_URL}
If we take a look at the Azure user-assigned managed identity in the portal, we can view the following details:
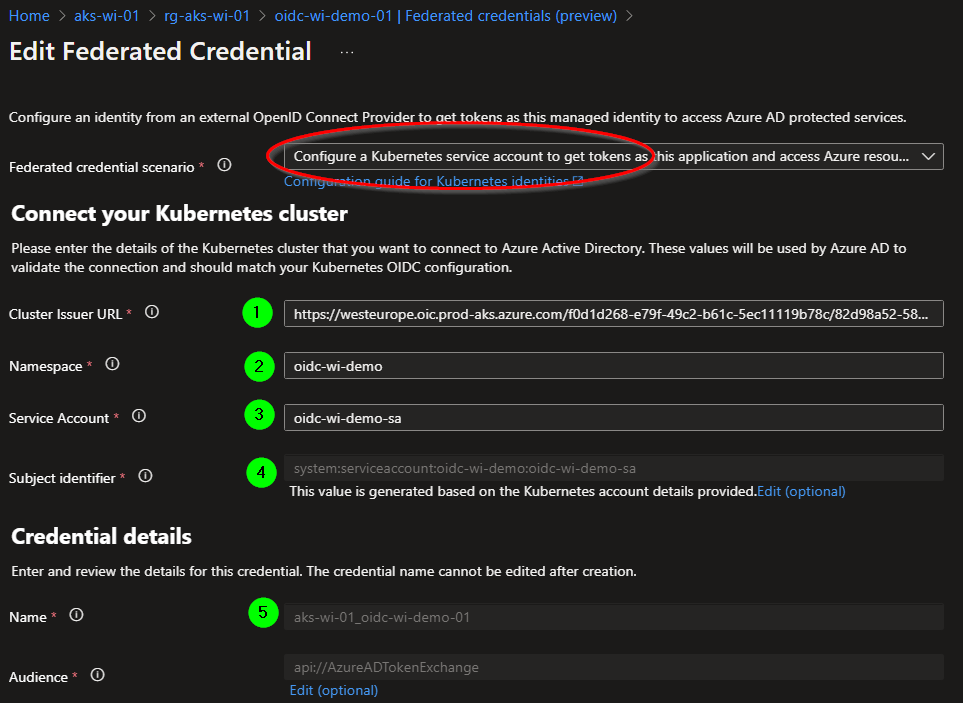
- [1] The AKS cluster OIDC issuer URL.
- [2] The namespace where the workload is going to be deployed.
- [3] The service account name is the one that is going to be used by the Pod.
- [4] The subject identifier gets auto-generated. It performs validations and makes sure that there are no invalid values.
- [5] Add a generic name which can be used to detect what this set of credential means.
By creating this credential, a trust is being established between The user-assigned managed identity and the Kubernetes Service Account.
7. TEST 1 : Azure CLI Pod
The setup for Workload Identity Federation is now done. Let’s test it and check out how to verify our configuration. By adding serviceAccountName in a Pod spec, all required environment variables will be made available inside the Pod.
cat <<EOF | kubectl apply -f -
apiVersion: v1
kind: Pod
metadata:
  name: azcli
  namespace: ${SERVICE_ACCOUNT_NAMESPACE}
spec:
  serviceAccountName: ${SERVICE_ACCOUNT_NAME}
  containers:
    - image: mcr.microsoft.com/azure-cli
      name: azcli
      command: ['sh', '-c', 'echo The app is running! && sleep 3600']
  nodeSelector:
    kubernetes.io/os: linux
EOF
The following command can be used to verify all Azure environment variables inside the Pod.
kubectl exec azcli --namespace $SERVICE_ACCOUNT_NAMESPACE -- env | grep AZURE

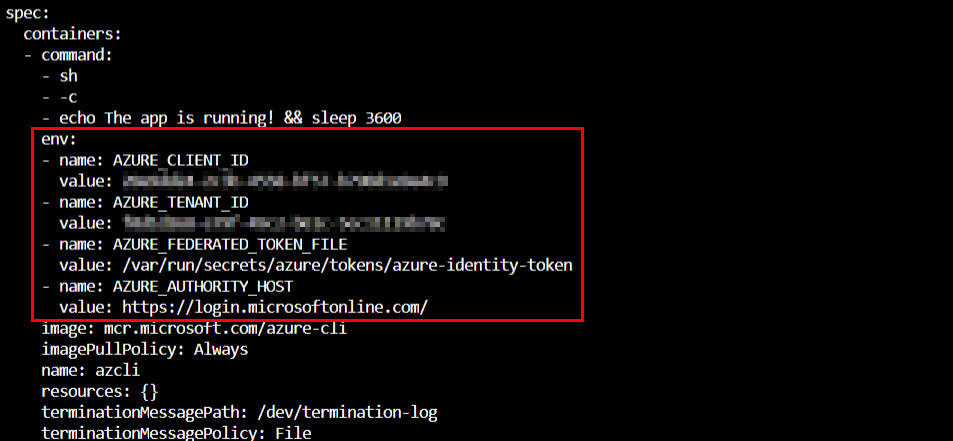
The four environment variables are:
- [1] The Client_id
- [2] The Tenant_id
- [3] The Federated Token File is the path where the project service account can be found.
- [4] The Authority host is the endpoint from where we need to fetch tokens from.
The following command can be used to retrieve the content of the federated token:
kubectl exec azcli -it --namespace $SERVICE_ACCOUNT_NAMESPACE -- /bin/bash
cat $AZURE_FEDERATED_TOKEN_FILE

!! Copy/paste the token on https://jwt.io to decode it, ONLY execute this step for non-production environments !!
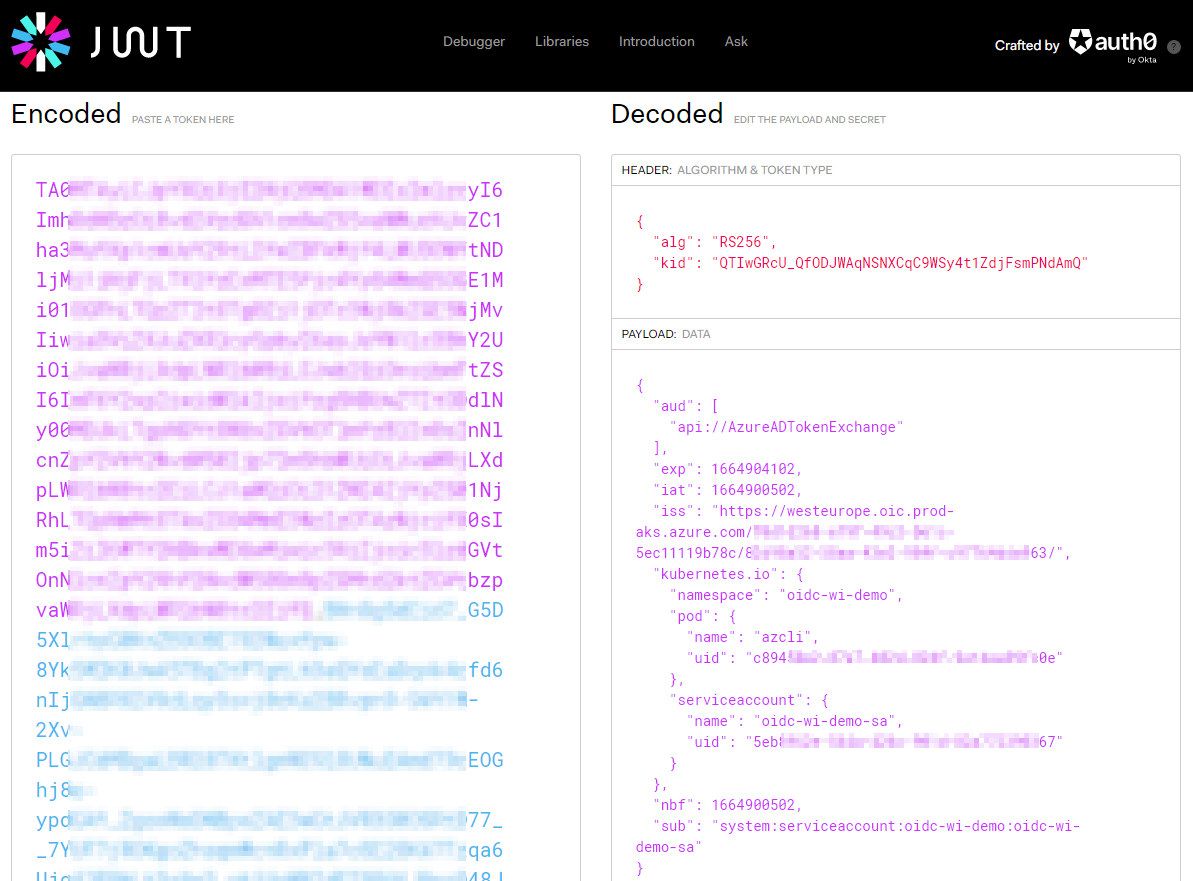
What other changes did the mutating webhook do on the pod that was deployed?
kubectl get pod azcli --namespace $SERVICE_ACCOUNT_NAMESPACE -o yaml
The first set of changes are the environment variables.
The second change is the projected servive account token. The expiration is set to the lowest possible value so that the kubelet will renew the token at 80% of expiry time.

Workload identity is based on projected service account.
How is this different from default service accounts?
JSON Web Tokens (JWTS) expires and have a proper issuer and the audience field comes filled out so that they can act like proper JWTS. These project service account tokens aren’t synced as Kubernetes secrets and they can only be injected in the Pod as a volume.
7.1 Get access token with the federated token
We are going to exec into the pod using the following command:
kubectl exec azcli -it --namespace $SERVICE_ACCOUNT_NAMESPACE -- /bin/bash
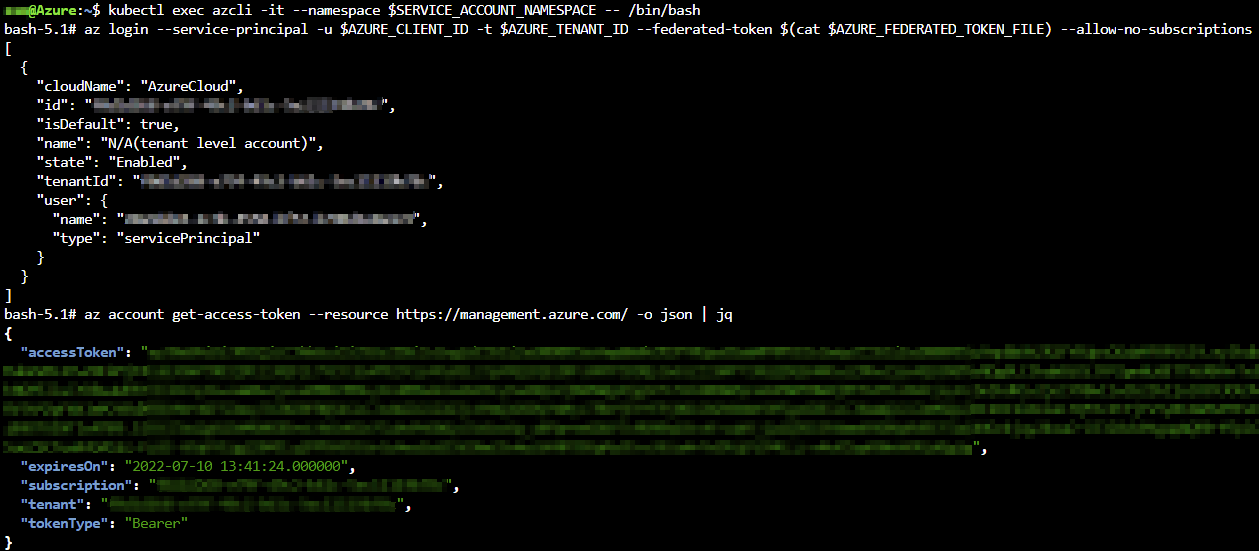
To consume the token, we are using AZ LOGIN in combination with all the environment variables which have been injected by the workload identity webhook.
az login --service-principal -u $AZURE_CLIENT_ID -t $AZURE_TENANT_ID --federated-token $(cat $AZURE_FEDERATED_TOKEN_FILE) --allow-no-subscriptions
No password is required. We can confirm that we are able to exchange the Kubernetes service account token for a valid Azure AD token. All of this by using federated identity credentials.
az account get-access-token --resource https://management.azure.com/ -o json | jq
8. TEST 2 : Read secret from Azure Key Vault
Together with the AKS cluster, we also deployed an Azure Key Vault with a secret using the GitHub workflow 001-infra-deploy.yaml.
The last step is to grant permissions to our Azure user-assigned managed identity used by our Pod to get the secret from the Azure Key Vault. The following CLI command will make this happen.
export KV_NAME="$(az keyvault list --resource-group $RESOURCE_GROUP --output tsv --query [].name)"
export KV_SECRET_NAME="$(az keyvault secret list --vault-name $KV_NAME --query [].name --output tsv)"
export MI_OBJECT_ID="$(az identity show --resource-group ${RESOURCE_GROUP} --name ${MI_NAME} --query 'principalId' -otsv)"

echo "The key vault name is $KV_NAME"
echo "The key vault secret name is $KV_SECRET_NAME"
echo "The enterprise application (service principal) object id is $MI_OBJECT_ID"

az role assignment create --role 'Key Vault Secrets User' --assignee-object-id $MI_OBJECT_ID --assignee-principal-type 'ServicePrincipal' --scope "/subscriptions/$SUBS_ID/resourceGroups/$RESOURCE_GROUP/providers/Microsoft.KeyVault/vaults/$KV_NAME"
Our Pod configuration file has our service account that we’ve created before. In addition, we define 2 Pod environment variables; the Key Vault name and Secret name we want to get.
cat <<EOF | kubectl apply -f -
apiVersion: v1
kind: Pod
metadata:
  name: federation-kv
  namespace: ${SERVICE_ACCOUNT_NAMESPACE}
spec:
  serviceAccountName: ${SERVICE_ACCOUNT_NAME}
  containers:
    - image: ghcr.io/azure/azure-workload-identity/msal-go:latest
      name: oidc-go
      env:
      - name: KEYVAULT_NAME
        value: ${KV_NAME}
      - name: SECRET_NAME
        value: ${KV_SECRET_NAME}
  nodeSelector:
    kubernetes.io/os: linux
EOF
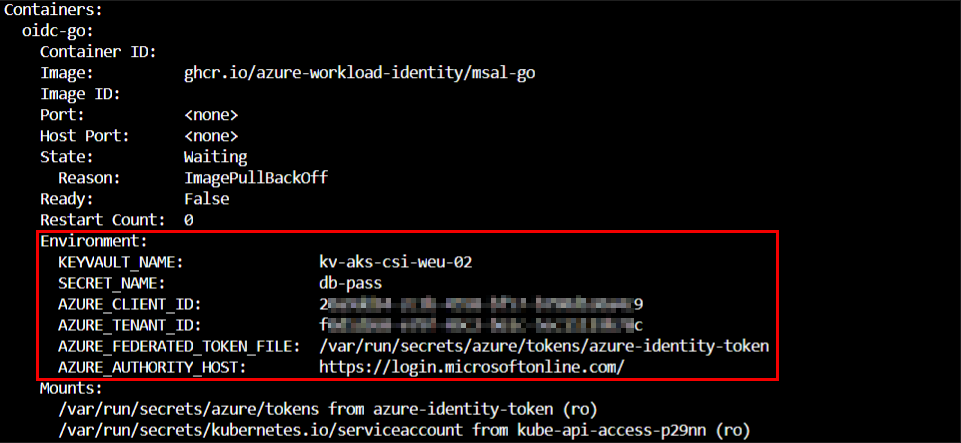
When we describe our Pod, we can see that the following environment variables are made available inside the Pod + the 2 environment variables explicitly mentioned in our configuration.
- AZURE_CLIENT_ID
- AZURE_TENANT_ID
- AZURE_FEDERATED_TOKEN_FILE
- AZURE_AUTHORITY_HOST
- KEYVAULT_NAME
- SECRET_NAME
kubectl describe pod federation-kv --namespace $SERVICE_ACCOUNT_NAMESPACE
If we take a look at the logs of our Pod, we can verify that our Pod can read the secret from the Azure Key Vault.
kubectl logs federation-kv --namespace $SERVICE_ACCOUNT_NAMESPACE

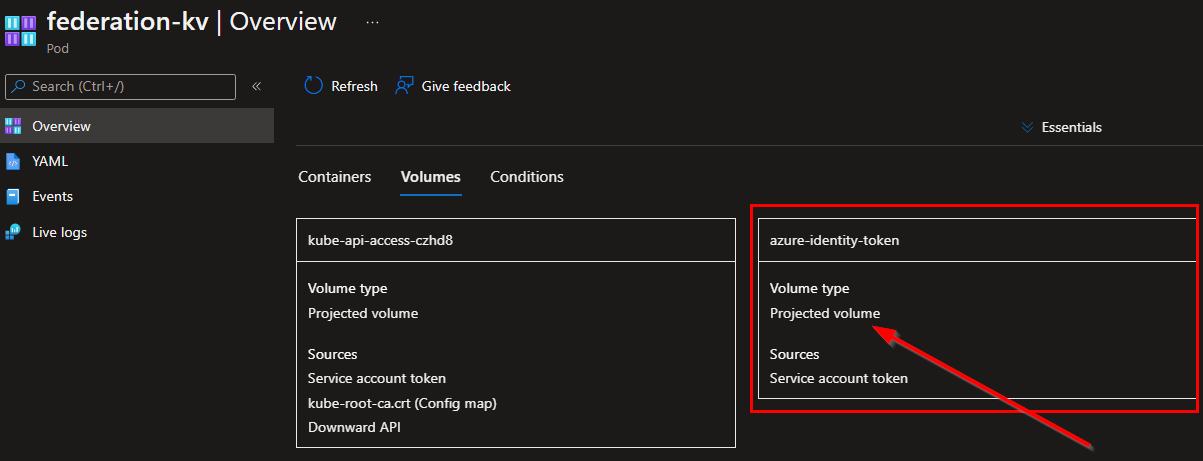
In the portal, we find back the projected volume attached to our Pod.
The configuration we used in this post can be found on https://github.com/dewolfs/workload-identity-federation-aks.
